Add Disqus Comments to Your Jekyll Powered Blog
In this article I will walk you through the steps I took to add Disqus comments to this blog. It's actually a lot simpler than you might think.
The first step is to create an account on Disqus if you have not already done so. I won't go into the specifics of how you do this as it's pretty self explanatory. Once you have an account and you are logged into Disqus you will need to create a new site (just click the "Add" button under "Your Sites").
You'll need to enter a site URL, a site name which is just for your reference, and a shortname for your site. Disqus will suggest a shortname based on the reference name you entered but you are free to change it to whatever you like.
The next step is to select the settings specific to your site. I won't cover what those are as Disqus does a pretty decent job of explaining everything. And don't worry, these settings are not set in stone. You have the option to modify them anytime you'd like through the admin dashboard.
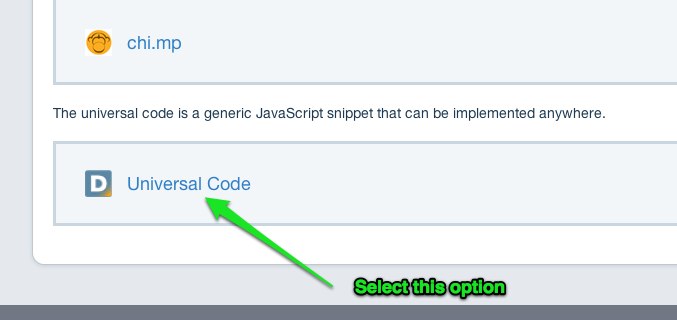
The final and most crucial step is to select the type of install instructions. At the top of the screen you will see a list of common blogging platforms. Since we are building a Jekyll powered blog we will not be using these options. Instead you will want to select the "Universal Code" option (see screenshot).
This will allow you to select a generic bit of code that looks like this:
 1 <script type="text/javascript">
 2     /* * * CONFIGURATION VARIABLES: EDIT BEFORE PASTING INTO YOUR WEBPAGE * * */
 3     var disqus_shortname = '<shortname>'; // required: replace example with your forum shortname
 4
 5     /* * * DON'T EDIT BELOW THIS LINE * * */
 6     (function() {
 7       var dsq = document.createElement('script'); dsq.type = 'text/javascript'; dsq.async = true;
 8       dsq.src = 'http://' + disqus_shortname + '.disqus.com/embed.js';
 9       (document.getElementsByTagName('head')[0] || document.getElementsByTagName('body')[0]).appendChild(dsq);
10     })();
11   </script>
12   <noscript>Please enable JavaScript to view the <a href="http://disqus.com/?ref_noscript">comments powered by Disqus.</a></noscript>
13   <a href="http://disqus.com" class="dsq-brlink">blog comments powered by <span class="logo-disqus">Disqus</span></a>
Before you go copying and pasting make sure you notice the disqus_shortname variable in there. You will need to change this to match your sites shortname. If you use this as is it will not work and you will be left wondering what the hell happened.
Where Should This Go?
Now that I've explained how to set up a new site in Disqus and get the code to display it in your site, your next question is probably where should I put it? Well, that's a good question. It really depends on how you have your site laid out. I, for example, use only one layout file. Obviously I can't just slap this code into my default template and run with it. The reason should be obvious but if I were to do this then every single page in my site would have comments enabled. I really don't want that to happen and I'm guessing neither do you; even if you are using a separate layout for individual blog posts.
To get around this I had to take a moment and think about it. Then I remembered that any options you add to the YAML Front Matter that are not predefined will automatically be added to the page object for you to use. This means that I can add a new custom option called, say, `comments' and set the value to true. If I don't want the page to have comments I can just leave the value set to false or I can just leave it out altogether.
1 ---
2   layout: default
3   comments: true
4   # other options
5   ---
Then in the layout file all I need to do is use a conditional statement to only display the Disqus Comment widget if the page is set up to receive comments.
 1 {% if page.comments %}
 2   <div id="disqus_thread"></div>
 3   <script type="text/javascript">
 4       /* * * CONFIGURATION VARIABLES: EDIT BEFORE PASTING INTO YOUR WEBPAGE * * */
 5       var disqus_shortname = '<accountname>'; // required: replace example with your forum shortname
 6
 7       /* * * DON'T EDIT BELOW THIS LINE * * */
 8       (function() {
 9           var dsq = document.createElement('script'); dsq.type = 'text/javascript'; dsq.async = true;
10           dsq.src = 'http://' + disqus_shortname + '.disqus.com/embed.js';
11           (document.getElementsByTagName('head')[0] || document.getElementsByTagName('body')[0]).appendChild(dsq);
12       })();
13   </script>
14   <noscript>Please enable JavaScript to view the <a href="http://disqus.com/?ref_noscript">comments powered by Disqus.</a></noscript>
15   <a href="http://disqus.com" class="dsq-brlink">blog comments powered by <span class="logo-disqus">Disqus</span></a>
16   {% endif %}
Now that you have this code in your application you may think you are done. Well, if you are like me and you are testing this locally then you need to do one more thing. In order for Disqus to work on your local machine you need to tell it that you are working in development mode. If you don't do this then you will get an message stating it can't reach the server. That is becuase when you created your new site in the Disqus admin panel you specified the live URL. Luckily, the brilliant minds at Disqus have made this really simple for us. All you need to do is add a new variable with a value of `1'.
 1 <script type="text/javascript">
 2     /* * * CONFIGURATION VARIABLES: EDIT BEFORE PASTING INTO YOUR WEBPAGE * * */
 3     var disqus_shortname = '<shortname>'; // required: replace example with your forum shortname
 4     var disqus_developer = 1; // This turns developer mode on
 5                               // Make sure you remove this before you push this
 6                               // to your live site.
 7
 8     /* * * DON'T EDIT BELOW THIS LINE * * */
 9     (function() {
10       var dsq = document.createElement('script'); dsq.type = 'text/javascript'; dsq.async = true;
11       dsq.src = 'http://' + disqus_shortname + '.disqus.com/embed.js';
12       (document.getElementsByTagName('head')[0] || document.getElementsByTagName('body')[0]).appendChild(dsq);
13     })();
14   </script>
15   <noscript>Please enable JavaScript to view the <a href="http://disqus.com/?ref_noscript">comments powered by Disqus.</a></noscript>
16   <a href="http://disqus.com" class="dsq-brlink">blog comments powered by <span class="logo-disqus">Disqus</span></a>
Once I had this set up, everything worked perfectly. If I want a post to have comments I just add the YAML Fron Matter and *poof* comments appear. Otherwise comments are left off and I can continue to use just one layout. Oh happy day!
Something missing? Need more explanation? Let me know in the